Customizing Chinese made S.S. solid rear strap

Build your own chastity belt or modify a bought belt
User avatar
Pyra Gorgon
Posts: 394
Joined: 06 Apr 2013, 19:35
Sex: Female

Customizing Chinese made S.S. solid rear strap

Post by Pyra Gorgon »

These Chinese chastity belts straight from manufacturer are JUNK!!!

However, don't let that scare you away from them! While these belts are absolute crap AS IS, they are AWESOME for modifying!!! They literally BEG you to modify them. Do not be afraid to do this, ladies! I was afraid, but then I thought to myself, "Self, WTF am I afraid of? I can't actually HURT this junky belt...so go for it!" Seriously, you can totally do this. Be crafty, you do not have to get dirty in a smithy pounding on hot metal or anything. You can do all this on your basement floor or outside on the patio.
You cannot modify a Tollyboy, Neo Steel, or My-Steel belt. And why would you? Those come atcha just right from the factory. But these chinese junkers...oh no.

Don't know HOW to trick out a chastity belt? Hey, no problems! Follow the Gorgon! I'll lead you through a very simple process, arm you with what you need to know, and you supply your own creativity and get a belt that is uniquely YOURS.

Girls, time to get your toolbox out! (if you don't have tools, borrow them or buy the cheapies from Harbor Freight. Every woman needs some hand tools for when the menfolk are busy with other things)

Tools you will need to customize a chinese made chastity belt:
  • Small 10 oz ball pein hammer
  • Pair of end nippers, at least 8 inch
  • small pair of pliers
  • small screwdrivers, #3, #2 #1 phillips and #0 flat tip screwdriver
  • Cordless screw gun
  • set of GOOD drill bits, 3/32, 1/8. 5/32, 3/16, and maybe 1/4" depending on which style you get. (BUY COBALT drills because you are working on stainless steel)
  • piece of oak hardwood flooring for an anvil
  • piece of thick hard metal, an old iron, a vise if you have one, anything made of smooth metal you can pound on. (i use a huge spike nail hammered into a piece of wood)
  • Sandpaper, silicon carbide coarse grit and medium grit (i think it is 100 and 180 grit or something like that)
  • Loctite threadlocker (get the red stuff!)
  • Clear silicon adhesive elastomeric caulk (GE, DAP, or 3M.) this is what is gonna glue down that difficult to glue silicone to your belt.
  • Fasteners--copper rivets (called "burrs", stainless steel rivets, aluminum rivets, whatever you can find that will not rust)
  • D-rings, stainless steel http://www.strapworks.com/D_Ring_w_Clip_p/ssdrc.htm
--------------------------------------------------------------------------------------------------------------------------------------------------------------------------------
STEP #1.
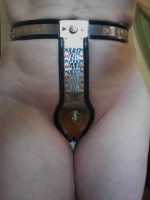
When you get your chastity belt in the mail, you need to adjust the belt to YOU. Do the best you can to keep the silicone liner on it, the metal is thin and it will dig in without it. So what system works best to adjust a chastity belt ??? Simple, you start with the WAISTBAND.

If you have a rear solid strap model, take your little screwdriver and pair of pliers to hold the locking nut and TAKE OFF the rear solid strap from the center rear of your waistband. Set it aside. We'll get to that next...
Take a cloth tape measure and stand naked in front of a mirror. You want to measure your waist above your hips at the smallest point. That is usually about 1/2 the distance between where you can feel your hip bone and your bottom rib, should be around your bellybutton somewheres. Keep the tape level around you, make sure it does not droop in back. Pull tape tight until it barely dimples your skin. Write down that measurement. NOW, inhale suck in your belly and pull the tape as tight as you can without hurting yourself. Write that measurement down. Subtract the larger number from smaller. Divide that difference, then ADD that difference back to your smaller number. With a piece of tape, mark your cloth tape at that length. Now, try it on for size. If that dimension is just unbearably snug, add a half inch or centimeter to it and try that. Remember, EVERYTHING ABOUT A CHASTITY BELT DEPENDS ON THE WAISTBAND STAYING WHERE IT IS SUPPOSED TO BE. You do not want it slithering up and down on you, especially in a solid rear strap model!

Take that waistband measurement you can comfortably suffer and adjust the waistband metal of the chastity belt. Temporarily fasten the two halves together with the small screws and lock nuts. Now place the liner back on the waistband, making sure the roll over silicone is in place. Now, get your lock out and put your waistband on, secure the ends together with the lock. Walk around, sit down, get up, climb stairs, bend over tie your shoes, etc. Wear it for about an hour. Does it wiggle up? TOO TIGHT! Loosen one hole on belt adjustment holes. Does it wiggle down? TOO LOOSE! Tighten one hole. This is critical to everything else. Get it right before proceeding.

ONCE waistband is adjusted and on your body (you are still wearing it at this point), you need to make some preliminary bends on your front shield and back strap, but first get rid of the secondary shield and locking post for that. Take it off. You just want to deal with the front shield right now.

ALL YOUR FRONT SHIELD ADJUSTMENT and REAR SOLID STRAP ADJUSTMENT IS DONE off of two points: the center of your butthole, and the urethra. First, you can either use your finger or something else (like a buttplug or whatever you want) to get the center of your anus. That needs to be centered on the anus ring of the chastity belts rear strap. Carefully bend it up toward your front, try to get a smooth covering over your vulva. You will most likely be hunched over while doing this, so after you get some quick curve to the front shield, occasionally stand up and hold it against yourself and see how it fits. You want the front shield to be tight, but not so tight it hurts. Your labia will most likely pucker through the front shield vagina slot. It is supposed to. If you are not getting any labia to squish through the slot, the front shield is not pressed against you tight enough. By same token, if your lips are turning blue, thats too tight. Needs to be as snug as you can tolerate. It is better to err on side of tightness than looseness in chastity belt fitting, though. Trust me, after 48 hours of wearing, your body WILL ADAPT and miraculously, the belt gets comfy. While holding that front shield in place, stand in front of mirror and look at how the front shield locking post holes line up with the posts on your waistband. Get a tape measure that while standing totally straight. Now, adjust the top of the front shield and use the little screws to hold it together.

Next step: Lock the adjusted front shield to your waistband. Now go back to the mirror and reach behind and press the solid rear strap into your butt, pull upward and make the crooked bend around your tailbone. Peek behind yourself and guesstimate how much up or down it is going to take to get the rear strap mounting flange to line up with the waistband adjusting holes. Adjust rear strap (i used one screw and had to move mine twice to get it right).

Take off your belt, fasten the rear strap to the CENTER REAR of the waistband. Measure it if you cannot eyeball it for center. Now use the screws and locking nuts to lock it on.

PUT THE LINER ON EVERY PART OF YOUR CHASTITY BELT. Now is your 3 hour wear time. Yes, you have to wear it. Move around. A chastity belt is not supposed to hinder any of your movements. Do your thang. If too tight? take off and make minor adjustments. Getting a buttcrack pinch? Reach back and give a bend to the metal. Sit down. Does the swell of the front shield gouge your groin tendons? You need to move it UP. Tighten one hole on top of front shield adjustment plate and loosen one hole on rear strap adjuster. Rebend and make sure your anus is centered on the hole. Go sit on the toilet. Reach under you and feel. Are you STILL centered on that hole? You better get it right, because first time you go to poop and that is not centered on your anus, you are going to have a nasty mess.

Wear the belt until you have to pee. When you pee through the front shield slot, does it hit the bottom of the elongated slot and splash everywhere? If so, you need to move front shield DOWNward.

This is where these chastity belt patterns from Chinese have issues. For some body shapes, you are just not going to get your anus centered, the front shield slot just right and also clear the front shield swell to keep groin tendon dig in from happening. Do the best you can. IF the belt is TOO LONG between those points, YOU CAN cut the center of the belt between vaginal slot and anus hole, drill holes and rivet the pieces back together. But that is going to make the silicone liner not fit right. Hopefully, you can get it "good enough". Remember, these are cheapie belts, not custom jobs from premium chastity belt makers. Caveat emptor.

STEP #2.
Permanently riveting together your chastity belt parts.

Take the liner off. take the rear strap loose from the waistband. Now, you need to install rivets in your waistband adjustment holes. When you start on waistband, you want to remember not to fill the holes needed to re-attach the rear strap at center back. You also do not want to fill the holes over the center of each hip (side) that you plan to install D-rings on.

Mark your parts with a big "O" for OUTSIDE with a Sharpie marker. (you can wipe that off later with rubbing alcohol). All your clean rivet faces need to be installed outside IN. You need to straighten out your belt parts, careful not to kink the metal. This is where you can get real fancy with rhinestone rivets you can get from Tandy Leather Co. or wherever. You can get brass rivets, or antique, etc. Rivets with gemstones come in all colors! Be artsy. Its YOUR belt, after all.
IMG_20130429_161213_0.jpg
I have photos attached to show you this filling with rivets. I used copper rivets because I think copper looks neatAnother showing them stretched out...
IMG_20130429_165113_0.jpg
IMG_20130429_165105_0.jpg
IMG_20130429_165100_0.jpg
Try and keep the outside face of your chastity belt clean and dent free and scratch free. Minor scuffs can be buffed out, but deep scratches will mar its beauty.

After you get your D-rings measured and attached where you want (be sure you remember which side of the waistband is UP for D-ring attachment!!!. maybe mark it with an arrow --> UPside.) you want to take sandpaper and rough up the INSIDE SURFACE as rough as you can. Wipe down three times with rubbing alcohol (90%) and wear rubber gloves. Any finger oil or anything else will detract from the silicone adhering to the metal as you glue your liner in place...

NEXT UP: GLUING SILICONE LINER IN PLACE. (to be continued...)
Chastity...fun to wear...horrible to have as a name!
User avatar
Pyra Gorgon
Posts: 394
Joined: 06 Apr 2013, 19:35
Sex: Female

Re: Customizing Chinese made S.S. solid rear strap

Post by Pyra Gorgon »

@ ALL:

This forum thread is a CUSTOMIZING a Chinese make FEMALE chastity belt: stainless steel rear strap model.

If you must post, please post questions about this process.

IF YOU HAVE ADVICE on THIS MODEL BELT, please post that. Idle banter and off topic questions will be ignored in this thread.
Chastity...fun to wear...horrible to have as a name!
User avatar
Pyra Gorgon
Posts: 394
Joined: 06 Apr 2013, 19:35
Sex: Female

Re: Customizing Chinese made S.S. solid rear strap

Post by Pyra Gorgon »

PART 2: Gluing up the front shield & piddling with hardware...

AFTER you get all your fancy rivets installed on your front shield and rear strap adjuster is set with rivets (I would caution against using bling bling on the rear strap because most stone rivets stick OUT pretty good ways, hard to clean around all those lil rivets on that small strap), you now have to glue up your liner to the front shield.

THIS is the silicone adhesive caulk I am using. Glued it up last night, today, the roll over edging was pulled away in a few spots due to lack of clamping pressure because of the big bulky copper rivets I installed. No matter, I shot more silicone under the edge, flipped it outside face DOWN and put presssure to backside and used the hardwood floor as my clamp surface. 4 gallons of water some books n paper ought to do the trick.

The tube in super tiny lawyer print says 3 days. That is what I am going to do: give it three days of clamp pressure from heavy junk, then transfer it out into SUNLIGHT on some brown paper bags for some solar heat curing of whats still gummy under the black silicone. That is what I noticed: the silicone fits tightly on the metal and there is no place for air to get in and cure it. So its going to have to be a slow heating to cure it. I am on DAY 2 right now. The back liner of the front shield is pretty tight: I can see every little rivet telegraphing through the silicone. Little swells, actually. Should be comfy.
Photo of silicone I am using. Try and find this and you'll get same results as me, for good or bad!
IMG_20130430_134756_0.jpg
Now...on to gluing up the liner. It's tricky..
Before you start, rewipe down all your stainless steel backside of the front shield and the inside of the silicone liner. Be sure to get in the channel of the liner as well. Lightly scuff up the silicone on the glue surface, I did mine just in the middle. Rewipe it down with 90% denatured alcohol. Needs to be very clean and dry.

On the side of the front shield that is going to be against your body, begin smearing silicone adhesive caulk on the surface. Don't glob or blob it on: use a pin and make a very tiny hole in the squeeze tube tip. Take your time and lay down a criss cross of little lines of silicone on the metal, starting at the anus hole opening and moving up the rear strap toward the last rivet hole there.

Now, on the liner, lay a fine line into the channel of the liner that goes from the anus hole up to the end where it will attach to the rear strap. Do only one channel, not both. The side that you put the silicone in the channel is your first EDGE TO PUT ONTO THE METAL.

Tricky, but curl the silicone into a U shape to avoid getting the other wrap around edge out of the silicone you put on the back of the metal. You WILL get silicone on the edge that faces out, so just have some paper towels with you. No biggie, just dont wipe off your silicone on the metal. Once you feed the one edge onto the metal and position it were it needs to be on the metal, grab the other free channel and slightly pull it so you can hook it over the metal. Once you have that done, lift the edge at the end of the rear strap and lay a bead of silicone up under the edge you did not glue before. Go slow and maintain equal bead thickness in that channel.

Wipe off any goobers you get on the silicone. Time to do next section:

Repeat process for holes around other side of anus hole and vaginal opening and stop just about an inch up the front shield from the top of vaginal cut out.

Wrap and get your silicone onto your metal of the area you just glued up. Glue up the other non glued side like you did before. (we are just repeating the first process but on different sections.

Last part is the wide section of the front shield and swell area. IF YOU WANT THAT SECONDARY POST on your shield, now is the time to put a drop of superglue around the hole and put the tiny screw in from the inside face of your front shield and screw down the post for it, putting the cross hole in the pin oriented the way you want the lock to fasten on it.

Glue up and fit up the remaining part of the front shield liner. Flip over on its back and wipe it down good. Don't worry over much about silicone on the metal, it can be scraped off with a razor blade later, or polished off if you do my trick of jeweling the face! (will show you how later on, coming up)

Massage the silicone, get out air bubbles and take a small jar or something round and roll about the back side to ensure the silicone liner is firmly embedded in the silicone you smeared on. Leave the squeeze out around the edge of the liner that curls around to the front. You actually WANT THAT. It will help make a water tight joint when fully cured. You will go back with a razor blade and carefully slice that off. So leave the squeeze out for now. Make sure the roll over edge to the front surface is fully flat on the metal.

Flip face side down and clamp with heavy stuff put on top: phone books, water jugs, etc. Dont get stupid with weight, just a few pounds is fine. (yeah, dont put furniture on top of it or anything! ;)

Patience. Wait a day. It should be set enough the silicone will not immediately pull away, but it is not cured enough to start to rebend your front shield. Expect full cure in a week, and plan on putting it in the sunshine for a few of those days. ALWAYS LAY SOMETHING SMOOTH DOWN WHEN LAYING OUT YOUR LINED METAL. This silicone is very soft and gummy: laying it directly on concrete or rough wood is going to mar its smoothness and beauty and grind abrasive things into its surface. Use paper, or better yet, hard smooth plastic.

When you are done, it ought to look like this:
Finished glue up of liner...waiting for it to cure fully
Chastity...fun to wear...horrible to have as a name!
User avatar
Pyra Gorgon
Posts: 394
Joined: 06 Apr 2013, 19:35
Sex: Female

Re: Customizing Chinese made S.S. solid rear strap

Post by Pyra Gorgon »

Piddling with hardware: Beefing up the security of the chinese hardware supplied

Okay, for the average girl, the difference between a padlock with a full shackleguard and a padlock dangling off something that is supposed to be a shackleguard seems pretty much the same thing...until you get uber horny and a flash of brilliance hits you like you just had a V-8 and remember your boyfriend/husband has a pair of those neat looking end nipper thingies for getting into tight spots...and the luggage locks supplied with these chastity belts look pretty sissified....yep, go for gusto and clip the shackle on the luggage lock and voila!!! you are out of belt in no time flat.

Yeah, well, a chastity belt needs just a fuzz more security so if the heat of the moment or frustration stupifies your senses, it will at least thwart attempts to get free with reasonable measures.

We need to beef up this shackleguard. We need to take a cheapie wannabe chinese shackleguard and make it into a NEOSTEEL style shackleguard!!! (yes, it can be done, and I've done it.)

You need a Dremel tool. Handy tool that! And a cut off wheel for it. Well, okay, a couple cut off wheels, those wheels burn up quick.

Chinese shackleguards, like provided, LOOK LIKE SUPER TEMPERED TRIPLE CURED STAINLESS STEEL. Yeah, but ummmm, they're not. They are just pot metal die cast with chrome flash. Maybe aluminum, but my guess is some zinc alloy. MEANING: its shit, okay? but, its YOUR shit, cuz you bought it with this cheapie chastity belt. No worries, even crap can be hard to deal with if you set it up right. IF you re-shape that shackleguard so the padlock shackle actually FITS into the dumb channel, you are NOT going to cut off that padlock with your husbands side cutters. Ain't happening cuz you cant get to it. You'll have to demolish the entire shackleguard of crappy zinc alloy and thats going to take some grinding or hard hitting with tools you dont want being done while you are wearing this thing. So problem solved! You're stuck, which is kinda the point of a chastity belt, anyways. I digress....
Time for photos...
My modified chinese shackleguard on LEFT, original shape of shackleguard on RIGHT
SIDE VIEW of My modification vs. original chinese one. notice the cut out ? That is what you are going to do.
Notice how the shackleguard original has a center hole, a cross hole through that and a central web that runs top to bottom? What we need to do is cut off one end on the BACK SIDE perpendicular to the central rib about 3/16" of an inch. You need to cut it all off until you hit the backside of the front flange. At the front flange you want to grind down about half way into it, still leaving the front face untouched. At the other end of that central rib, you want to grind just the web between the outside and inside rings. You want to carefully grind it into a nice rounded shape inside to follow the curve of the shackle. I am referring to the TOP side. The bottom of the shackleguard is what sits against the padlock body.
Finished product, front view
Finished product, REAR view
Do not overdo it. First make your cut out on the bottom, make sure it is nice and straight and penpendicularly square to the center web of the shackleguard. NExt grind the upper part of that shackleguard web a little at a time until you can get the padlock to click shut. The center hole through the web should sit horizontal as you hold the shackleguard on the padlock up right in your hand.

Clamp and be careful to not mar the chrome face.

If you do not have a dremel tool, you can still do this, but you will need to use a coarse file and a vise instead. Take you longer, but not much. We are working with zinc alloy, not hardened tool steel here.

One final note: Do NOT try and relieve the shackleguard front face into the padlock. I tried and discovered the brass is not thick and exposed the locking point spring of the padlock. Bad, since any crud that gets in there will jeopardize future function of opening your padlock. Photo showing this is HERE---->
Notice spring in my cut out? Yeah, bad. Dont try this. You'll just ruin your lock. Instead, relieve more metal in shackleguard
NOW you have a shackleguard JUST like NEO STEEL shackleguards!!!

NEXT UP: making the locking post assembly and cross pin and other stuff to use this shackleguard you just made on and LOCK YOUR BELT!
(we are still waiting for lining to cure, so let's put time to good use!)
Chastity...fun to wear...horrible to have as a name!
virginitysaving
Posts: 182
Joined: 20 Nov 2010, 21:22
Sex: Female

Re: Customizing Chinese made S.S. solid rear strap

Post by virginitysaving »

Is it possible to modify locking post and use a tubular lock instead padlock?
User avatar
Pyra Gorgon
Posts: 394
Joined: 06 Apr 2013, 19:35
Sex: Female

Re: Customizing Chinese made S.S. solid rear strap

Post by Pyra Gorgon »

virginitysaving wrote:Is it possible to modify locking post and use a tubular lock instead padlock?
This chastity belt does not come with a tubular lock. It comes with what I have shown. I am working with what I have available. I am guiding the average woman (like YOU) through the process of customizing this chinese made solid rear strap female chastity belt with what is commonly available.

Here is a great idea for you, virginitysaving: BUY this belt:http://www.dhgate.com/hot-female-adjust ... ml#s4-12-1 It is identical to the one I am customizing only secondary shield is different.

Once you have your belt (ought to be about a month), then follow my instructions for adjusting the belt to your body and follow the gluing instructions.

You can have a whole sack of tubular locks, but without a chastity belt, you just have a sack of tubular locks!
Chastity...fun to wear...horrible to have as a name!
User avatar
Pyra Gorgon
Posts: 394
Joined: 06 Apr 2013, 19:35
Sex: Female

Re: Customizing Chinese made S.S. solid rear strap

Post by Pyra Gorgon »

What to do about secondary shield on this belt...

Been thinking of ways to eat up some of the sloppiness of fit between the secondary shield and main crotch strap that is on this belt...

Trying plasti-dip and see how this works. Unclear how durable this is, will find out after wearing for a bit.

Same rules apply: scour entire metal good, wipe clean to degrease and get rid of powder debris with 90% denatured alcohol, then go for dip!

Photo of my second dipping:
2 coats plasti dip coating, about 1/8" thick layer deposited
Chastity...fun to wear...horrible to have as a name!
User avatar
Pyra Gorgon
Posts: 394
Joined: 06 Apr 2013, 19:35
Sex: Female

Re: Customizing Chinese made S.S. solid rear strap

Post by Pyra Gorgon »

UPDATE on gluing...
chastity belt being difficult. Silicone keeps wanting to pull up on rear strap and around upper edge of front shield swell. Strips of tape and some sunlight time ought to help...
Use strips of tape and tape tightly to force curl edging over onto front shield. I think these issues are caused by thickness of rivets I used. Be careful when you do this to use thin backed rivets or you may encounter similar issues with peel up on front face of shield.
Chastity...fun to wear...horrible to have as a name!
User avatar
Pyra Gorgon
Posts: 394
Joined: 06 Apr 2013, 19:35
Sex: Female

Re: Customizing Chinese made S.S. solid rear strap

Post by Pyra Gorgon »

CREATING the LOCKING POST

The next step, now that we have our fancy NeoSteel-ish shackleguard all fabricated and ready to go is to create something to lock it onto.

That thing is called the MAIN LOCKING POST. A chastity belt can have lots of posts, secondary shield locking post, rear shield locking post, locking post to hitch your cell phone onto... whatever. But the one that locks it onto your body is the MAIN LOCKING POST. That means this post is the one that has to provide the most security. Needs to be beefy, tough, and all that jazz. Most likely will get the most wear on it too. We need to keep this in mind as we try and come up with something.

Go to your local hardware store and purchase a 5/16" by 1" long carriage bolt made of STAINLESS STEEL. I bought one from Lowe's. Cost me .90c. I only need one, you might want to buy 2, in case you screw up one, you have a spare and won't have to make another trip.

Okay, so you are looking at this shiny small bolt and wondering why I specified a carriage bolt. Simple. Notice the square bottom at the end of the threads by the head? We need that. That square by the underside of the carriage bolt head is called the SHOULDER.

So let's consider what requirements we need out of locking post. We need it to insert nicely into the shackleguard we made. Sure. But we also need something that is not going to accidentally bend on us, not pull through our thin stainless sheetmetal waistband; we need it to not fall out and hit us on the toe every time we take the chastity belt apart, either. So that means we need it to not spin when we grab the lock all crazy trying to get out of our belts in fits of passion, we need it to not get pushed out the back side when our hands are wet from the shower and mis-align the tabs when putting the lock back onto it. We need the thing to not move on us.

The best way is to spot weld it onto the waistband. But, if you are like me, you are fresh out of welders, or skill to do that. Sticking with our dremel tool or small hand files and a hacksaw, we can do this.

First, we need to take the center hole of our locking tab of the waistband and make the center one BIGGER. The one drilled from factory is just too small. Its for a cheesy lil post that unscrews easily. So...drill the hole 1/4".

Now, take a pencil and draw a square around your hole. The sides of the square ought to be parallel to the waistband. Then we take our dremel with a cut off wheel, and cut out the square. If you have small burr, you can use that too. I used a worn cut off wheel because a new cut off wheel has too big a diameter. So I used one that was almost dead. Still worked. ;) After we get our square cut, check the fit of the shoulder of the carriage bolt. Does it fit nicely without slop? NO SLOP! It is better to be snug than loosie goosie. Take your time and do it right.

Once that is done and the shoulder fits tightly, you need to relieve your corners. Take the cutoff wheel and go into each corner of the square at 45 degrees, and it needs to be a bevel taper, going from nothing to full depth over 1/8" or so. When you are done, it will look like this:
The angle corner bevels are on the OUTSIDE face of the waistband, not the side that goes against your body.
Now for the bolt.

First, take your cut off wheel (or hacksaw), and cut at a 45 degree angle through each corner until you are flush with the back side of the carriage bolt head. Do all 4 corners. When you are done, it ought to look like this:
Try and keep the cut corners as thin as you can. DO NOT cut into the bolt shank deeply, what we are trying to accomplish is a sliver off each corner!!!
When you test fit them together, do you have something that looks like this?
Finished step of creating holding flanges for our locking post!


So why did we go through all this work? Weeeeeeelllllll, here's a sneak peek of how this works....

When we are ready to mount our locking post, we are going to take a straight tip screwdriver or a cold chisel and drive into our cut slots, thus driving it OUTWARD into our cut out slots. Then we are going to take that same cold chisel and our ball pein hammer and do our best to flatten and squish as much as possible of those corner wedges that were once part of the carriage bolt shoulder flat with the waistband surface. We wont stop until we fill that cut groove in the square corners, then we'll take our cut off wheel and grind off the extra that is creating a bump on our surface of the waistband belt. This will lock the locking post to our waistband preventing the post from spinning around, nor will it be pushed out the backside of our waistband!!!

And we did all this without a welder. Some of us even used a hacksaw to do this!!! Crazy huh?

[NEXT STEP: cutting locking post to length and drilling our cross pin hole. Easy as apple pie]
Chastity...fun to wear...horrible to have as a name!
User avatar
Pyra Gorgon
Posts: 394
Joined: 06 Apr 2013, 19:35
Sex: Female

Re: Customizing Chinese made S.S. solid rear strap

Post by Pyra Gorgon »

JEWELING the Front Shield
Jeweling, or fancy swirl patterns, is long and tedious process. However, once done, your front shield will flash and shine, reflect light like a disco ball!!! Snazzy. :D
TOOLS NEEDED:
Dremel tool
stainless steel wire point, stiff bristle single point, or stiff felt small barrel
rouge or other coarse polishing compound

The process of jeweling ANYTHING has 4 steps:
LAYOUT
JEWELING PATTERN MAIN LINES
FILL IN JEWELING
CLEAN UP/ polishing


So let's look at the first step;
LAYOUT is where you can stretch your creativity and design whatever you want. You have to keep it simple, though. Jeweling does not lend well to intricate pictures. Better to stick with some geometric design. Typical designs include spirals, starbursts, arches, interlocking squares, polygonal shapes, etc. I chose a starburst pattern for my front shield. ;)
Pattern drawn on with pencil.
JEWELING PATTERN MAIN LINES

Jeweling is best done by overlapping your circles about one third to one quarter. Tighter makes the jeweling look fuzzy and kills the distinctness of pattern. To begin your jeweling, place your single point (or socket wire cup) into the dremel, you run at medium speed, NEVER FULL SPEED! While medium speed, dip the tip into your rouge green, or red polishing compound to coat the bristles. Now, keep the tip always perpendicular to your surface. Place your work in your lap, wear safety glasses because jeweling throws a lot of spatter from the polishing compound. Wear an old shirt too. ;) Better yet, wear an apron.

Take your time, each time you dab down with light to moderate pressure hold in spot on metal for a 3 second count. Lift your bristle tip and place up from your last circle, overlapping just a bit, and stay on your pattern main lines. You jewel out your main lines first, then you go back and do fill in between them later.

After 5 to 8 dab downs with the bristle cup/ point, re-dip your tip still spinning back into your rouge or coarse polishing compound (or stick like mine is). It is better to dip more frequently than not enough.

Start with the center of your pattern and work to your edges. Once your center is done, then carefully jewel around the liner edge careful to not bump your silicone edging. All that squish out of silicone caulk from gluing the liner will quickly get spun away while jeweling your edge. ;) (told ya not to worry overmuch about the slop on the face of your shield. Jeweling will buff it right off!!!)
Do the center jeweling of your pattern first, then do your edges. Lastly, you will fill in between your main pattern lines.
Top of shield showing jewel tracing around my shiny copper rivets! Those rivets are going to be a focal point of my shield presentation.
And lastly, a picture of the shield with all jewel tracing done, ready to be filled then polished clean!!!
I stopped my jeweling just on the top of the labia slot. I did not feel it wise to run down and around. jeweling leaves micro fine scratches, and down there, every little scratch and nook and cranny can become future stink points, so best to leave it highly polished.
[NEXT UP: FINISHED FRONT SHIELD, on to waistband, then re-assembly!]
Chastity...fun to wear...horrible to have as a name!
Post Reply