Some have coated chains, some do not...
Some have Burg Wachter blocking lock for waistband main post lock, some have the cheesy luggage lock and ill-fitting shackleguard. (refer to: Customizing solid rear strap for details on how to modify the luggage lock and shackleguard to make it operate like a NeoSteel locking mechanism)
Some have the triple slot front shield, some have the urine hole center panel style.
ALL OF THEM ARE SAME Dimensional materials, liners of three basic colors (pink, blue, black), and front shield swell in same location.
So, whatever the particulars of YOUR Chinese made florentine, the processes HERE are the same. We are not changing ANY dimensional characteristics EXCEPT for rear chain lengths and where they are fastened in the rear of the waistband.
============================================================================================================================================
STEP #1: REAR CHAINS
I am assuming you have already sized and adjusted/fitted your belt by this time. IF not, then do so first.
The rear chain positions are 3 inches from CENTER REAR BACK, each way if you are between the heights of 5'5" and 6'-0" and between 135 -190 pounds.
If you are 5'5" or LESS, or LESS THAN 130 lbs, your rear chain mounting points will between 2" - 2 1/2" each way from CENTER REAR BACK.
If you are 6'0" or TALLER, or GREATER THAN 195 lbs, your rear chain mounting points will be between 3 1/4" to 3 3/4" each way from CENTER REAR BACK.
Those are general averages for most women and a good starting point. Before final riveting of mounting D-rings for rear chains, go with what is ultimately comfortable.
YOU MUST REPLACE ALL D-RINGS ON CHINESE BELTS, do not use factory supplied D-rings for long term wear. They are nickel plated steel and WILL RUST.
The lower D-ring on Chinese florentines is on the secondary shield. Take two pair of pliers, or use two long steel rods 3/8" diameter with a block of wood for fulcrum to expand your D-rings so that they will slip into the curled stainless steel bracket. Use padded jaws on a pair of slip joint pliers to slowly squeeze the ends tightly together but not hard enough to mush the steel curl that accepts the D-ring ends.
IF YOU have not already riveted the factory mounting plates for D-rings, throw those away and just use the strap provided with the stainless steel D-ring you purchased from http://www.strapworks.com/D_Ring_w_Clip_p/ssdrc.htm. Much easier. I wish I would have, but my belt was already in service and had to retrofit. My waistband liner already glued, so I just swapped out the nickel plated steel D-ring for a stainless steel one and abandoned the stainless steel strap. I'll probably regret not going through the work of doing it right later on, but I am really getting tired of fussing with these belts and getting lazy.
While you have the D-rings off, NOW is a GREAT time to apply plasti-dip to both ends of the rear chains and also, if your chains are too long, time to clip a few links before dipping ends. (I had to remove 3 links to get a perfect rear chain fit that made the front shield hug tighter.)
While you have secondary shield still off belt, NOW is a good time to jewel your front shield (like I did) if you want to...
Also, those lil urine holes in the secondary shield on most are pretty much worthless given their minute size. Now is the time to take and enlarge a few of those holes in the center rear portion of the urine hole area. Be sure to de-burr the edges nicely. I opted to plasti-dip my secondary, that is your choice if you want to or not.
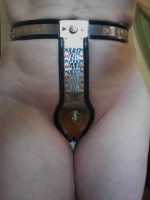
- Finished maintenance and modifying Chinese Florentine style- pink
- Frontal view
- Oblique view showing permanently mounted vag insert
The rear chains are dipped to eliminate a STINK POINT
The D-rings are swapped out for stainless steel to eliminate a RUST AND STINK POINT
The secondary shield is riveted to front shield to eliminate a PINCH POINT
The black rubber O-ring being used as a shim on the lower secondary shield posts acts as a SPACER to eliminate a PINCH POINT
This belt is now pinch free, and mostly stink free. There is still areas that can get urine trapped between both shields on outside only because I totally filled the slot inside the front shield with silicone to prevent urine from getting all over in between the shields and up under the liner which always likes to lift from the steel.
If your florentine is like mine with the Burg Wachter blocking lock, there is no need to replace or fool with it. Those are plenty secure! You can pick them if you know how, but you are stuck when you try and extract that pin without the key that acts as an pin extractor.
I hate that clunky secondary shield lock, so it went bye bye. There is zero use or need to ever remove the secondary shield ONLY while still belted. The slot is totally too small to effectively allow you to clean, it is just as easy to get around the shield and perform hygiene in this model belt. Juss sayin...